Want to print faster without losing quality? The key is to know the volumetric speed limit of your 3D printer and your filament. In this guide we explain how to do it in a practical way with a volumetric speed test.
What is volumetric velocity?
The volumetric flow rate indicates how much material your hotend can extrude per second. It is measured in mm³/s and defines the actual limit of printing speed you can reach without underextrusion.
This parameter depends on:
🌡️
Printing temperature
Precise heat control for optimum extrusion and material flowability
🧵
Filament type and quality
Determines the viscosity and flowability of the melt during extrusion
⚙️
Type of hotend and nozzle
Defines the melt capacity and output diameter of the extruded material
What do you need?
A good high quality PLA filament, such as our PLA 1KG Figutech, made in Spain.
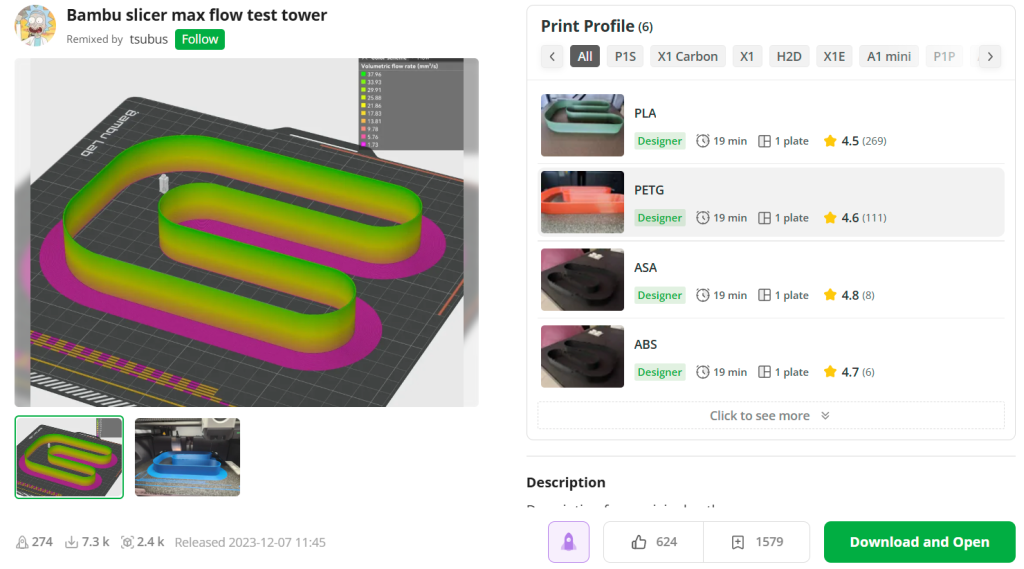
We use the free “Max Flow Test Tower” model available from Makerworld: https://makerworld.com/en/models/85600-bambu-slicer-max-flow-test-tower?from=search#profileId-91491
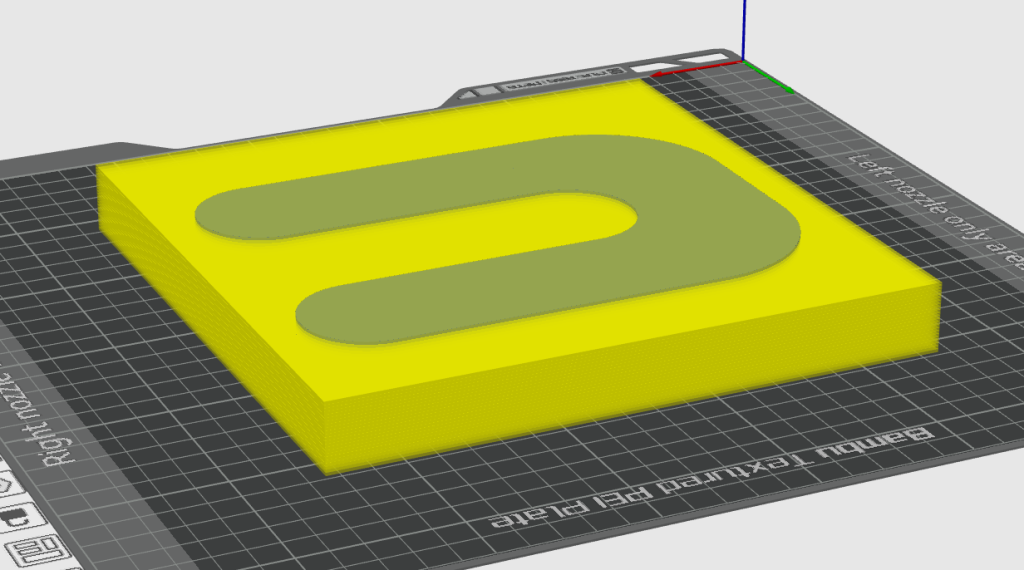
When you import it into your BambuStudio, you will usually get something like this in the preparation tab:
The yellow square is actually several levels that determine the zones in which the test is increasing in volumetric speed. Click on laminate and be patient because all these levels slow down the generation of the G-code.
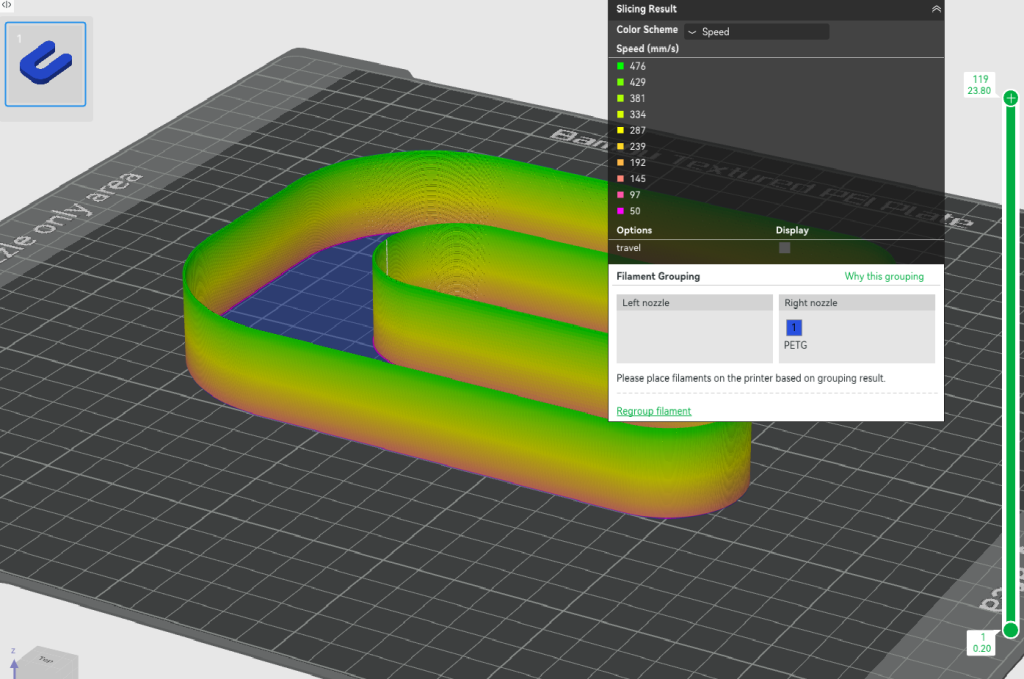
Once ready to preview, you must open the speed tab to check that all speeds are set correctly. In this case you can see that the test will print at up to 476 mm/s real speed.
Analyze Volumetric Velocity Test Results
We tested this test with the following characteristics:
The tower changes speed progressively, visually showing you where your hotend/filament starts to fail.
EVO-X Ultra S PETG Filament Results
Important: You do not need to change retracts or fan for this test. The objective is only to identify the point where the speed starts to generate problems.
Up to what volumetric speed do we reach with this test?
The “Max Flow Test Tower” model file we used in this test reaches a maximum of 34.59 mm³/s, starting from 11 mm³/s at the base. This is achieved using a standard Bambu Lab H2D nozzle, without modifications.
Every millimeter in the Z-axis increases the printing speed by 14 mm/s, which translates into a 1 mm³/s increase in volumetric flow.
TIP: In this file, you can know your maximum flow rate by adding +10 to the height where your tower starts to fail. For example: if it starts to visually fail at 22 mm height, your estimated maximum flow rate will be 22 + 10 = 32 mm³/s.
Image of the designer from the Makerworld archive
What if you use a high flow nozzle?
If you have a High Flow hotend (such as Rapido HF, Revo HF or CHT), you can test flows up to 60-65 mm³/s without any problem.
❗ But the original file does not go that high.
How to extend the test to higher flows?
In OrcaSlicer you can do this in 2 clicks, adjusting the flow per layer from the “Per Layer Settings” panel.
In Bambu Studio, you need to manually modify the G-code per layer. Here is a GCODE that you can copy and paste on each layer up to 50mms on the last layer for the same design:
G-code para Test de Velocidad Volumétrica - Bambu Studio
Instrucciones:

En el deslizador de capas, haz clic derecho en cada altura indicada
Selecciona "Añadir G-code personalizado"
Copia y pega el G-code en las capas correspondientes.

G-code por altura de capa
Altura 5mm
gcodeM221 S150
M117 Flow: 6mm3/s
Altura 10mm
gcodeM221 S200
M117 Flow: 8mm3/s
Altura 15mm
gcodeM221 S250
M117 Flow: 10mm3/s
Altura 20mm
gcodeM221 S300
M117 Flow: 12mm3/s
Altura 25mm
gcodeM221 S375
M117 Flow: 15mm3/s
Altura 30mm
gcodeM221 S450
M117 Flow: 18mm3/s
Altura 35mm
gcodeM221 S550
M117 Flow: 22mm3/s
Altura 40mm
gcodeM221 S650
M117 Flow: 26mm3/s
Altura 45mm
gcodeM221 S750
M117 Flow: 30mm3/s
Altura 50mm
gcodeM221 S875
M117 Flow: 35mm3/s
Altura 55mm
gcodeM221 S1000
M117 Flow: 40mm3/s
Altura 60mm
gcodeM221 S1125
M117 Flow: 45mm3/s
Altura 65mm
gcodeM221 S1250
M117 Flow: 50mm3/sç
Speed Test Results
The results have been surprising:
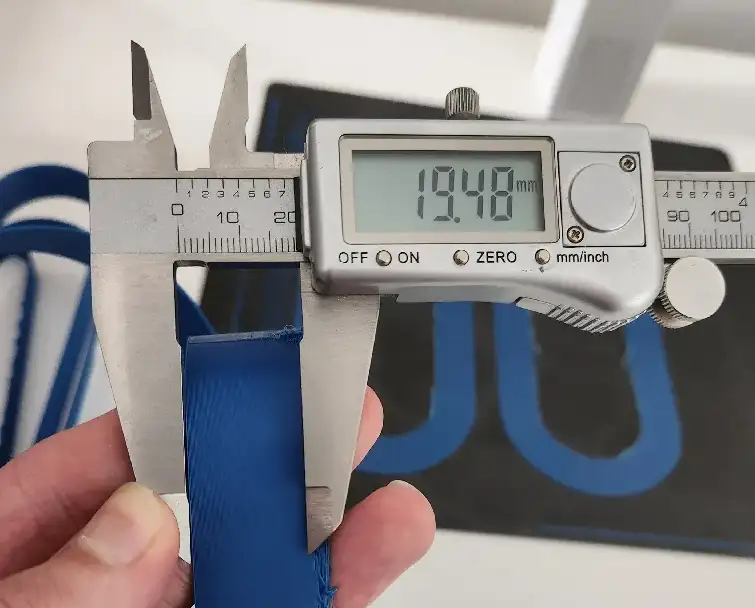
PETG EVO-X Ultra Speed effortlessly reached 476 mm/s in the test, with no signs of underextrusion or layer failure.
PLA Figutech ONE has been stable up to 300 mm/s, with excellent visual quality and no extrusion irregularities.
This shows that both materials are ready for high speed printing, provided that the system (hotend, slicer and temperature) is correctly adjusted.
What do we learn from this speed test?
This test does not simply measure the displacement speed, but the actual maximum flow that the hotend-filament can maintain without failure. Printing at 300 mm/s at 0.1 mm height is not the same as printing at 0.28 mm height. The real key is in the volume of material you extrude per second.
Therefore, it is essential to understand this key number: mm³/s.
Speed recommendations according to hotend type:
Standard hotend (type MK8, V6, etc.): We recommend not to exceed 24-28 mm³/s with PLA. Going beyond this hardware can lead to extrusion failures, especially in parts with continuous zones.
Bambu Lab (hotend stock): Allows you to work with a maximum flow rate of up to 40 mm³/s. With good cooling and quality materials, you can reach the real 300 mm/s without compromising quality.
Hotend High Flow (such as CHT, Revo HF, Rapido HF, etc.): These systems allow flow rates up to 65 mm³/s, a real barbarity. Here we are talking about real speeds above 400-500 mm/s, especially useful for functional printing and large parts.
Tip from the Figutech team: It’s not just about reaching the maximum flow rate, but keeping it stable throughout the printing process. If your parts have thin areas or many retractions, adjust the accelerations and jerk to not saturate the extruder.
How to Increase Speed?
Once the tower is printed, the next step is to visually analyze in which layer the quality starts to degrade. You can detect:
Sub-extrusion (inconsistent walls, voids)
Change in color or brightness (symptom of overheating or poor cooling)
Vibrations or artifacts
Loss of adhesion between layers
For more precision, you can use the slicer preview (flow mode) and check the exact mm³/s value in each layer.
How to calculate the volumetric flow rate?
Use this formula: Flujo volumétrico (mm³/s) = velocidad de impresión × ancho de línea × altura de capa
For example: 300 mm/s × 0.42 mm (ancho) × 0.2 mm (altura) = 25.2 mm³/s
If your tower fails at 26 mm³/s, you know that you can work at 300 mm/s in that geometry without problems.
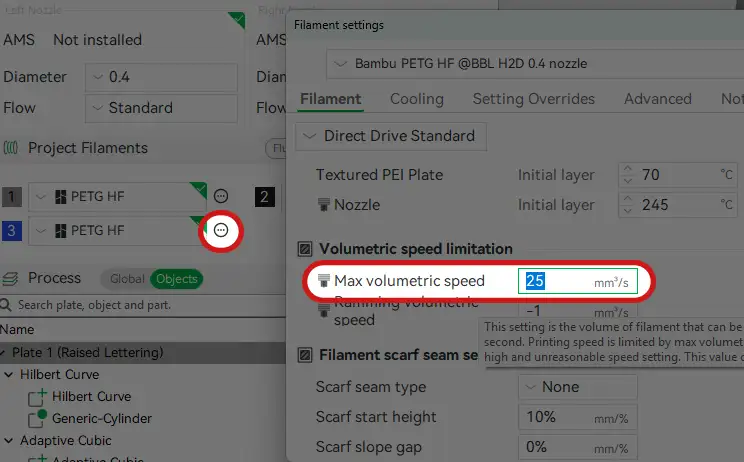
Once you have identified your maximum stable flow, adjust that limit in your slicer. For example, in Orca or Bambu Studio:
Go to Filament > Maximum Flow Rate (Volumetric Flow Rate)
Sets a value 10% below the observed maximum. (e.g.: if your PLA degrades at 30 mm³/s, set 27 mm³/s to be safe).
Thus, your slicer will automatically adjust the speed so as not to exceed that flow, maintaining quality regardless of geometry.
We promise to send you only what interests you: practical advice, special discounts and access to free samples of our filaments. No spam, only benefits.